

How To Attach Inflatable To Roof
As a new kayaker, information technology can feel like there's a lot to learn and a lot of accessories to get your hands on. But later on buying the best kayak for your needs and getting a compatible roof rack, you'll need to know how to strap a kayak to a roof rack.
Transporting your kayak safely is disquisitional to your power to explore new waterways with your new kayak. The truth of the matter is that a roof rack and kayak straps are only as good equally your ability to employ them properly.
So we're going to walk through the procedure of loading and strapping a kayak to a roof rack step-by-stride. Pay shut attention so y'all can protect your investments and make sure your kayak doesn't fall off your roof while you're driving.
Table of Contents
- 1 Jargon Buster
- 1.ane Cam (or Necktie-downwards) Straps
- 1.ii Daisy Concatenation
- 1.three J Rack
- 1.4 Crossbars
- 2 How To Fix Your Straps
- 2.i Setting Straps for a J-Manner Roof Rack
- 2.2 Setting Straps For Batten-Based Racks
- 2.3 Loading Multiple Kayaks
- 3 How To Load Your Kayak(due south)
- 3.i Two-Person Loading
- 3.2 Ane-Person Loading
- 4 Kayak Loading Best Practices
- 5 How To Secure Your Straps
- 5.i The 'Daisy Concatenation'
- v.2 Securing Bow and Stern Lines
- half-dozen How To Check Your Work
- seven Final Thoughts
- eight Enjoyed How To Strap A Kayak To A Roof Rack? Share information technology with your friends so they too can follow the Kayak Help journeying.
- 8.ane Share on Pinterest
Jargon Buster

Before we talk over the details of strapping a kayak to a roof rack properly, you'll need to know some important kayak terminology. Y'all'll find these terms mentioned afterward on in this article.
Cam (or Necktie-downwards) Straps
These are the most common straps used to secure kayaks to roof racks of all types. They are preferred over ratchet straps considering you don't need to tighten them down more than you can do by hand in order to keep your kayak on the roof rack.
Daisy Chain
A daisy chain is a technique used to eliminate the excess length of a strap from flopping loosely in the wind while driving. It'southward also useful for reducing wear and tear on your straps and we'll cover how to make a daisy concatenation later on in this article.
J Rack
A J rack is a blazon of kayak that (surprising as it may be) is shaped like the letter J. These racks must be attached to existing roof-mounted crossbars, only they are a useful and affordable way to secure kayaks to your roof.
Crossbars
These are bars that attach to the roof of your vehicle and they run across the width of your vehicle (from side-to-side). Kayaks tin can be loaded directly onto crossbars, just almost kayak-specific roof racks need to be secured to crossbars to provide a more than stable method of transporting kayaks.
How To Set up Your Straps
Before you load your kayak onto a roof rack, it's often easier to set the straps in place first. This will help yous ensure that your straps are solidly in place before looping them up and over your kayak to necktie information technology down.
Setting Straps for a J-Style Roof Rack
If you accept a J-rack installed on the crossbars of your roof rack, it's fifty-fifty more important to set straps in identify before loading your kayak. Because of their design, information technology tin can exist difficult to set straps in identify properly after your kayak is already upward on the racks.
When setting straps for a J-manner roof rack, thread the strap through the upper U-shaped portion of the rack. This is the longer side of the rack and information technology's the side that volition wind upwards behind your kayak once it'southward loaded.
After yous thread your straps through the upper section of your J-racks, run them towards the front end and back of your vehicle, respectively.
The strap on the rear-most rack should run towards the dorsum of your vehicle and the strap on the forrad rack should run downwardly over your front windshield.
Running your straps like this and leaving them in place earlier loading your kayak makes it complete the next footstep properly in one case your kayak is loaded.
Setting Straps For Crossbar-Based Racks
If you just have crossbars on tiptop of your roof, you can run 1 strap under each batten so permit each to hang down against the side of your vehicle.
Some kayakers will choose to fix their straps on the passenger side of the vehicle so that the buckle of the strap winds up being accessible from the commuter's side when the tie-down is consummate.
Loading Multiple Kayaks
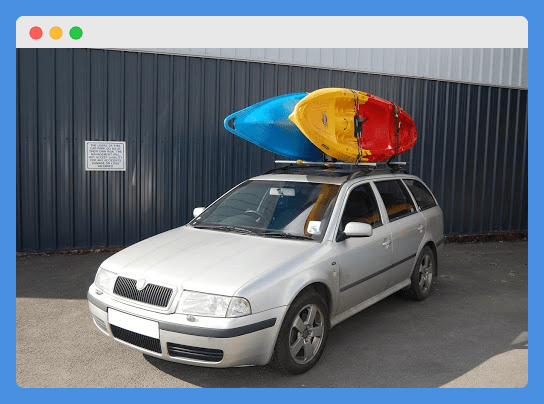
If you lot're loading multiple kayaks onto your roof rack, it's fifty-fifty more important to set straps in place before loading either kayak onto the roof. This is considering the first kayak volition often terminate upward making it more difficult to set straps in identify for the 2d.
To make your life easier, get all of your straps in identify before y'all load kayaks onto your roof. Then load them ane at a time and also strap the starting time down snugly before loading the 2nd kayak on.
This ensures that your first kayak stays in place if yous bump information technology with the second as you're loading.
Besides, several unfortunate kayakers have damaged their boats because high winds blew their first kayak off the rack while they were attempting to load the 2nd i.
Performing a preliminary tie-down helps you protect your kayaks and eliminate the need to do the aforementioned work twice. You can e'er go dorsum and tighten all straps downwardly securely one time everything is loaded onto your roof rack and you're performing a final check.
How To Load Your Kayak(due south)
Learning how to load a kayak onto a roof rack is of import for your prophylactic and the safety of your kayak. And then we'll cover some basic techniques for safe loading (and unloading) before we get to securing your straps and hitting the road!
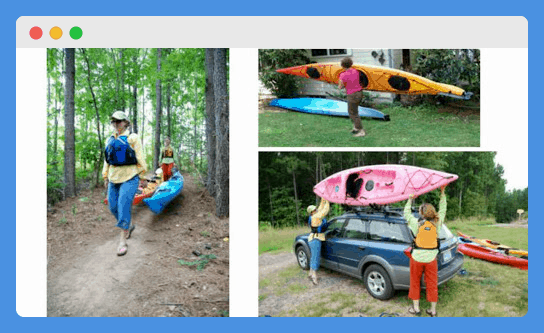
2-Person Loading
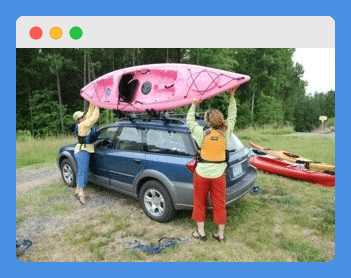
If you take a paddle partner with you, we always recommend loading and unloading kayaks with two people. Information technology helps to share the weight and besides reduces the clumsiness of carrying a unique object like a kayak.
The exact loading technique you utilize volition evidently depend on your specific vehicle, the type of roof rack you lot have, and the size and shape of your kayak. Just here are a few full general recommendations.
For alpine vehicles, take the taller individual prepare his or her end of the kayak on the roof beginning before coming effectually to assist the shorter individual with their end. It'south best to avert stepping upward onto a vehicle tire or runner while conveying the weight of a kayak.
In some cases, information technology can be easier to load the kayak starting from the rear of the vehicle.
In this case, one person should set their end of the kayak onto the roof racks from the back of the vehicle and so stay on one side of the kayak to help guide the kayak as the other person pushes information technology forrard onto the racks.
Ane-Person Loading
The Elevator-and-Load –
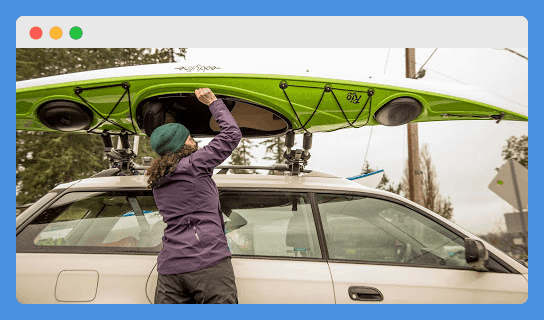
Loading a kayak onto a roof rack past yourself tin be catchy, but it's not incommunicable. If your kayak is light plenty for you to lift over your head easily, and then you can try positioning it on the side of your vehicle to start.
You lot should be standing on the side of the kayak that'southward furthest away from your vehicle and information technology's easiest to start past lining up the cockpit of your kayak roughly between the crossbars of your roof rack.
Side by side, attain down and grab the handle (or cockpit border) furthest away from you and tip the kayak towards you lot and onto its edge. With your other hand, take hold of the reverse handle (or cockpit edge), bend your knees, and lift with your legs.
By putting your hands in these positions, you'll exist able to either load your kayak on its side on a J-mode rack or turn it over to load it face up downward directly on crossbars.
Keep in mind that this technique should only be used if your vehicle is curt enough for you lot to lift the kayak onto the roof without stepping on a runner, tire, or ladder to achieve the requisite height needed.
The Angle Approach –
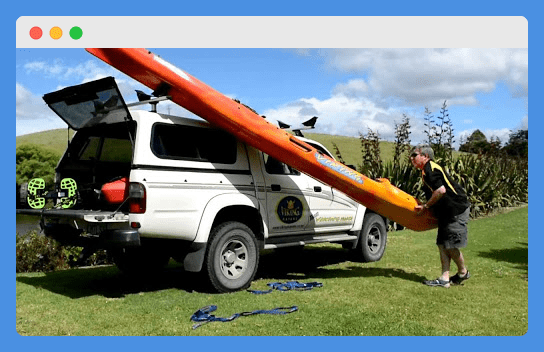
If your vehicle is besides tall or your kayak is likewise heavy, you'll need to accommodate your i-person loading technique.
The best mode to do this is to start by positioning your kayak on the side of your vehicle but slid farther toward the rear of your vehicle than you would start with the previous technique.
To make sure your kayak is aligned properly, ensure that the bow of the kayak is somewhere in between the two crossbars of your roof rack. This volition ensure that you can get the bow of your kayak onto the rear batten during the next footstep.
The first office of this technique is going to involve lifting the bow of your kayak and getting it secure onto the rear batten of J-style rack on top of your vehicle. Simply before you elevator, in that location'due south a footling prep you demand to do.
In lodge to ensure that the kayak doesn't slide off your roof once y'all set the bow up and let go, y'all should angle the stern of the kayak out and away from your kayak.
You lot don't need a true 45-caste angle between your vehicle and your kayak, but at least thirty degrees is recommended for safer loading.
Afterwards you've angled the stern of your kayak away from your vehicle, identify a towel or cream pad underneath the stern to reduce the likelihood of damage from the extra weight that will exist placed on the stern when yous elevator the bow onto the roof rack.
In one case the pad or towel is in place, you tin can lift the bow and place it gently on the rear crossbar or J-mode rack.
Being careful to make sure the front of your kayak remains in place when you remove your hands, you can then move effectually to the stern.
To finish this technique, you'll demand to gently elevator the stern while pushing the entire kayak forward and onto the roof rack.
If you're loading directly onto crossbars, information technology tin can be good to slide the kayak on face-up before flipping it over once the weight is safely on summit of your vehicle.
For J-style racks, you might angle the kayak away from your vehicle less considering the upturned forepart section of the rack will aid you concur the bow of the kayak in place while yous elevator and push button the stern forward.
Considering of their design, J-style racks come with advantages and disadvantages when it comes to loading and transporting kayaks. If you have this type of rack, be sure to check out our article detailing how to load a kayak on a J rack.
Kayak Loading Best Practices
E'er brand sure your kayak is centered on your crossbars before strapping it down. If your kayak is face down, the cockpit should exist located straight in between the crossbars when it is centered.
Centering your kayak is important if y'all're loading on to a J-style rack every bit well.
Even though your kayak will rest on its side on this type of rack, the cockpit should still be positioned betwixt the two racks to ensure the weight of the kayak is centered properly.
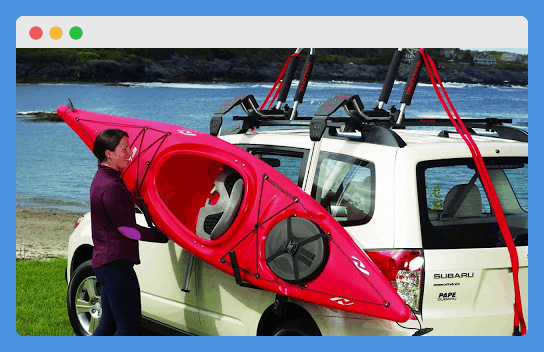
How To Secure Your Straps
One time your kayak is loaded and positioned properly, it'south fourth dimension to strap it down! Provided that y'all've done all the work leading up to this point thoroughly, this should really exist the easiest part of the process.
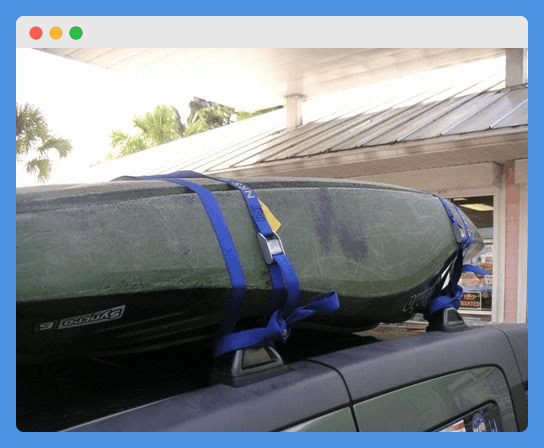
Whether you have a J-rack or you lot're but loading onto crossbars, the first step is to loop your straps up and over your kayak. They should so fall over to the contrary side of your vehicle where you can secure them.
Before you insert the strap into the buckle and tighten, cheque to make sure that the strap isn't crossed over itself. Also, it's all-time to untwist the strap so that it lies flat against your kayak and isn't twisted over multiple times.
For both crossbars and J-racks, you should then loop the open end of the strap (the stop without the buckle) under the actual batten on summit of your vehicle. This is the strongest tie-down point possible and should exist trusted over the front, U-shaped department of a J-rack.
Go along in listen that you should always run the strap under the crossbar inside of the bespeak where the crossbar really attaches to your vehicle. If you run it under the crossbar outside of this signal, the strap could skid off the crossbar entirely if it loosens while you're driving.
Once yous loop the strap nether the crossbar, run it back upwards and towards your kayak until y'all meet the buckle finish. To set this up easier, the buckle should already be hanging roughly halfway down the side of your kayak.
And then you lot can thread the strap through the buckle and pull dorsum towards yourself to tighten.
If you have to button the strap abroad from your body to tighten the strap, you'll need to re-evaluate and fix the strap up and so that you lot can pull towards you to tighten once you thread the strap through the buckle.
Pull both straps snugly only not likewise tight in guild to avoid causing unintended damage to your kayaks. To test, take hold of agree of either end of your kayak and shake it from side-to-side to ensure information technology isn't going to move while you're driving.
The 'Daisy Chain'

The daisy chain is a way to eliminate the extra length of strap that's falling down the side of your vehicle once the strap is pulled to your desired tightness.
This keeps the excess strap from flapping in the wind and causing damage, either to itself or to your vehicle/kayak.
Then allow'due south detail how to daisy chain a kayak strap once information technology's tightened down. To get-go, you'll want to double the strap dorsum on itself and tie a knot simply beneath the buckle. This essentially creates a fail-safe to continue the desired tightness on the strap if the buckle does happen to neglect.
When yous double the strap to make this knot, you lot'll create the loop that y'all'll utilize for the daisy chain. Using that initial loop equally a guide, double the strap once again and place information technology through that loop.
You lot'll now take the first to your concatenation and you tin repeat this process as much (or as piddling) as needed depending on how much excess strap you have.
When you're nearing the terminate of the strap, you can place the stop through your terminal loop to substantially tie the strap to itself and secure your daisy chain in place.
After that, yous'll take about half the excess strap to constrict away so it doesn't flap in the current of air. If you demand a visual representation of this technique, hither's a neat video on how to daisy chain a kayak tie-down!
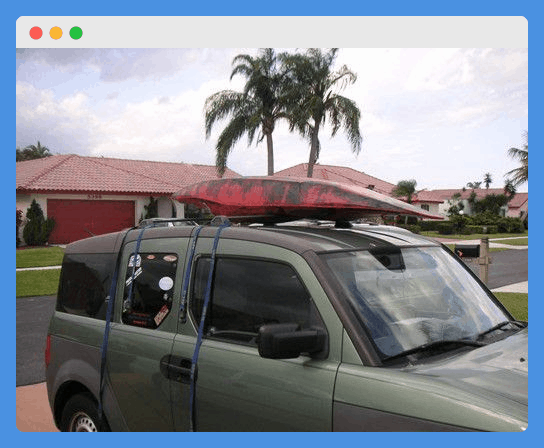
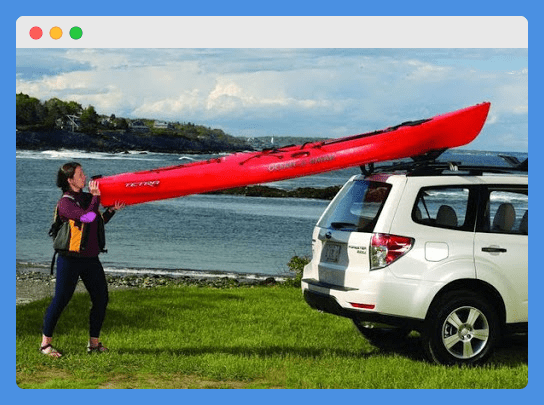
Securing Bow and Stern Lines
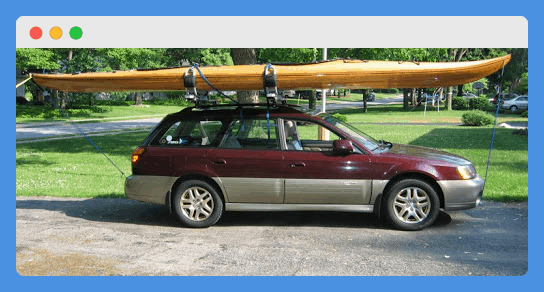
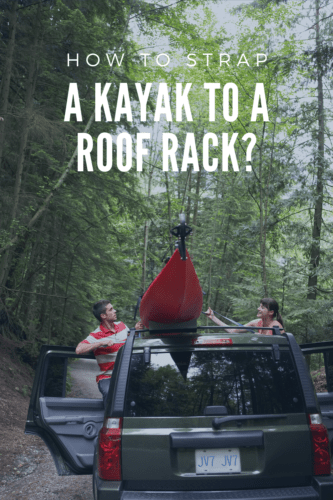
If you accept an actress-long kayak on a shorter vehicle (e.g. the picture higher up), you'll want to secure bow and stern lines to further protect your kayak from shifting while driving.
These lines will ensure that high winds don't lift the bow or stern of your kayak upward and cause unsafe driving conditions.
Your stern line volition also serve equally a useful place to attach a bright red or orange flag to alarm other drivers to the presence of a long kayak extending further back than the usual length of your vehicle.
You tin use a pretty standard rope for your bow and stern lines, as long as it'south in reasonable status. But for more security, nosotros'd recommend using a rope with a thickness of at to the lowest degree one-quarter of an inch in bore.
Y'all'll use the handles at the bow and stern of your kayak as the upper anchor points for these lines. And you'll want to brand certain yous don't have a bunch of excess rope that's going to terminate of flopping around in the wind.
And then you can either measure out the distance from your kayak to the secure points on your vehicle and cut the rope to that desired length.
Or you can expect online to find your desired length of NRS cam straps and use them for bow and stern lines besides.
For the lower anchor points, many vehicles have metal tie-down points located just under the bumper and welded directly to the frame.
These points are oftentimes used to tie vehicles downward when they're being transported across the country on trucks or trailers.
These points should always be used as the lower ballast points for bow and stern lines over simply tying the line directly to the bumper or crafting any other DIY solution. These metal ballast points volition provide the most solid style to ensure the safety of your kayak.
How To Check Your Work
Believe it or not, in that location is such a matter as pulling your straps too tight when strapping down your kayaks. Generally speaking, this isn't an issue for plastic kayaks, but it certainly can be for boats made of fiberglass, composite, or inflatable materials.
For the latter, yous want to pull your straps down so that in that location'south enough tension to keep your kayak in place. But you want to avoid too much tension because it can consequence in your kayak warping (fiberglass and composite material) or rupturing (inflatable cloth).
A common mistake amid new kayakers is tightening straps down so that you tin can 'pluck' them to create noise (kind of like plucking the strings on a guitar).
Only you lot want to stop before tightening your straps to this level, as information technology likewise creates the risk of the straps or buckles becoming compromised and let loose under the additional stress of air current from driving.
Final Thoughts
Before we finish up, we can't over-emphasize the importance of double-checking your work before driving off with your kayak on a roof rack. It's e'er proficient to get a second fix of eyes to brand sure everything is tied downwardly properly.
There'southward a great risk to improperly strapping a kayak to a roof rack and it tin can put many things in danger, including other people on the road.
Just if you lot follow the instructions we've laid out above, y'all'll be able to strap your kayak to a roof rack in minutes and be on your way.
And at present that you take your kayaks loaded and strapped down properly, where are you lot off to? Check out some of the all-time kayaking destinations if y'all're looking for new waterways to explore.
![]()
Author: Peter Salisbury Pete is the Owner of KayakHelp.com. Born and raised in Cleveland, Ohio, he grew up kayaking, line-fishing, sailing, and partaking in outdoor adventures around the Great Lakes. When he's not out on the h2o, you can find him skiing in the mountains, reading his favorite books, and spending fourth dimension with his family unit.
Source: https://www.kayakhelp.com/how-to-strap-a-kayak-to-a-roof-rack/
0 Response to "How To Attach Inflatable To Roof"
Post a Comment